Showing posts with label bags. Show all posts

Friday, April 11, 2025

2025-April: Waterproof Insulated Lunch Bag with Drawstring!

C's insulated cloth lunchbox was getting really worn and gross (there are only so many times you can wash those before they have perma-stink) so I made her a new one! I was so happy to find the free pattern on this website, CraftPassion, and I modified the dimensions based on some comments in the post.

Read on to see how I made it!

The finished bag! Made with video game themed woven quilting cotton outer, and waterproof PUL (polyurethane laminate) inner. Finally, another good use for PUL besides all those cloth diapers I made long ago!

My fabric print was (mostly) one-directional (starring Mario, Sonic, Kirby, Zelda, and lots of pixellated friends), and the pattern has you fold the outer fabric to form the bag. So that one side of the print would not be upside-down on the final bag, my first step was to prep the outer piece. I cut it in half, turning one half upside down, and sewed the halves back together. That way, both sides of the bag would show the print right side up!

On the right is the finished PUL inner. That was more straightforward to sew, but I still had to run it through the machine under parchment paper, since the seam was PUL touching PUL: a recipe for sticking and messing up! If you have parchment paper under the presser foot, PUL won't stick!

I bought some insulation batting just for this project. I've never used Insul-Bright, but it was fine to sew with and does work well in the finished bag, keeping food cold all day! I clipped it to the video game fabric and treated it as part of the outer.

The pattern has you fold up the base of the folded-in-half outer just a few inches, then sew up the sides (over that fold). This will make the base of the bag. So you can see, folding up 3" will give you a 6" wide base. You'll see!

Closeup of my little outer sandwich

Ta-da! We've made an actual bag with a flat base!

How cool is that? (The inner, handles, and top drawstring fabric come next.)

Showing off the base. You can see my initial seam to make everything right side up. Also, this base folds flat when the bag is empty!

I didn't photograph the inner, handles, and drawstring top clipped up, but here they are sewn in! I also sewed the casing ("tunnel") for the drawstring to go through.

I bought my first roll of cotton webbing strap material for handles, just for this project, and I LOVE it. I didn't feel like going through the process of cutting out and sewing up quilting cotton for (ultimately flimsy) handles, and the webbing is an amazing, sturdy shortcut!

After all these bags I've made, why haven't I bought webbing before?! Well, I have a roll now . . . so I'll be "on a roll" with handle making. :D

You sew 4 rows around the top to hold everything in place. This is a good idea, so the top and inner don't pull out and flop around. 

Here are my humble drawstrings: a spare shoelace cut in half! ;D I tied knots on the cut ends and took a torch to them to melt the plastic so it wouldn't fray.

I threaded the drawstrings through the top casing. I always tend to forget how drawstrings work (ha!) but you have to thread them so each string starts and stops at the same opening, leaving a U shape across the opposite opening. Hope that makes sense!

Next time I would do two things differently with the drawstring: 1) use longer strings; 2) Make the casing bigger. PUL is thick and doesn't cinch all that easily.

On the plus side, once cinched, it's very snug, so the bag isn't really going to open. So you don't necessarily have to tie the strings.

And it's done!

At first I wasn't sure what to make the drawstring top out of, but C. reminded me that it needed to be PUL so the whole inside is waterproof. Smart kid!

The finished bag!

C. has gotten some compliments on her lunch bag, and people are surprised to learn that her mom made it. ;) It was a satisfying sew!

How about you? Would you like to sew your own lunchbox? Or would you order a cool one from Dorybird instead? :)

Friday, March 7, 2025

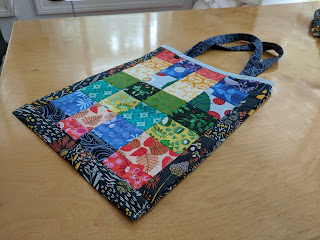
Patchwork Bag for Kelly's birthday present!

I got Kelly a couple crochet books for her birthday, since I was captivated with the one I saw at the library -- she crochets, I only wish I crocheted. Maybe someday I'll learn! Anyway, I planned to give them to her in this bag I made (as the wrapping paper), but I didn't finish it in time. So I gave her the bag a day or two later. :)

Finished crossbody tote bag!

How about some process photos? It was a simple sew, since I've made this style of bag a lot before!

Some of my myriad charm pack squares laid out, for the front and the back.

Friday, June 23, 2023

2022-Jan: Party favor drawstring pouches


I made these little pouches to hold favors at E's birthday party. :)

Wednesday, June 7, 2023

2021-Dec: Little floral bag - clutch - pouch

Just a little envelope-style storage bag I made for E.


2021-Sept: Flower and Pokemon zippered Pencil Cases!

 
I made these zippered pencil cases for my girls for the start of school. E requested appliqued Pokemon on hers, so I made it happen!


The Pokemon outer and both linings are made from a sturdy canvas.

I love how they came out! C's flower case now holds art supplies at home, but E still brings hers to school every day!

Monday, March 22, 2021

2020-December: Patchwork Bag

 I made this bag for my best friend!

It's a second version of a previous bag I made.
I used the same pattern and previously-cut-out-pieces from a long-time-ago bag for a different friend!


I love them both, and I'll most likely make more of this bag in the future!


Friday, September 20, 2019

2018-December: some Xmas gifts

2 tote bags (with internal pockets) and a pair of waterproof mittens


2018-June: Patchwork bag

I'm in love with this bag. It was a gift, but I cut out the pieces to make my own, too. A year+ later, I still need to put it together . . . :)


Monday, November 14, 2016

2015-December: Doctor Who Zippered Pouch

I had some PUL left over from this Doctor Who diaper, so I decided to make a waterproof zippered pouch for my friend C.!  I used this tutorial from Purl Soho, only I didn't line it.


process pic of putting zipper on


Even though the zipper was a bit wonky on the ends, I think it came out pretty well.  It was fairly easy to make, too!

I added a little scrap of knit fabric for a hanger loop, too.


  Hey, C., what are you using this bag for? :)
Monday, July 25, 2016

2014-December: Book Club Bag

My book club was having a Christmas party/Yankee swap/White Elephant gift exchange/celebration, so of course I chose to make something!  (I always make something!)  I had found instructions for a cute little bag in a library book and decided it would be perfect.

Supercute finished bag; scroll down for process photos!


First, I chose a bunch of fabrics to use, and cut them to size.  This project was great for using my "charm packs".

I stitched the various rectangles together

And through the magic of rotary cutters and further stitching, I made these little checkerboards!  I LOVE this process -- it looks like you did a ton of work, but it was really MAGIC!


Then the sides of the bag got sewn on.  I don't remember why I was measuring, but the whole bag was really small.  And CUTE!

Then through some other process, a lining was added. (Helpful, I know.  Hey, it's been a year and a half since I did this; I can't quite remember everything!)

And the bottom is on.

Ta-da!  We have a bag!

Ooh, but what's this? Making handles for the bag?


Handles are snapped on! I actually remember the book saying something about buying leather handles for this project, but where the heck do you get those?  Good thing I make cloth diapers and have plenty of snaps (and improvisational skills)!

See?  It snaps shut!


Cute bag, ready to go to its new mystery home!


Here it is, fluffy with a scarf I was also passing on to the swap.

The bag was a hit!  I know because it got "stolen" a couple times through the absolutely unfair rules of the swap . . . I hope you found some use for the bag, V., and I know, J., that you still want one!  I definitely plan to make more of this ilk!  Possibly in a slightly larger size, too.